A Short Explaination on Watching the Pod Casts.
The most recent Pod Cast is the one that is showing in the Pod Cast window just below.
When you click on the Pod Cast to view the video, it will play.
When it is finished playing you will see other Pod Casts that have been uploaded show up and you can scroll through them as you wish and pick from any of them to view. Most are only a few seconds long and a couple are about 2 to 3 minutes.


Live Steam Events; past and future.

In the podcast window below you will find a number of short clips from various activities. Enjoy !

FUTURE EVENTS:
Check out the Lake Shore Live Steamers web site for a current schedule of runs. www.lakeshorelivesteamers.com


Live Steam Powered Podcast

Monday, August 10, 2015

Check out these signs plus much more at www.fairweatherfoundry.com

 
Crossbuck: $30.00 Unpainted.

End of Block: $15.00 Unpainted.

Keystone Whistle marker: $15.00 Unpainted.


Truck set (Bolster & 2 side frames) $50. Unmachined.
or $90 per pair (2 Bolsters & 4 side frames.
There are no prints or sketches for these. Once you set down and measure things out, it's quite easy to figure out the cuts. You do need a milling machine and a good mill vice.
 

Sunday, August 9, 2015

Yep....It's been a while.....

Last year, I was informed that a foundry furnace was up for sale. Over 20 years ago, I had met the owner and he cast an item for the Fitchburg. Apparently, he had passed away about 5 years ago and family was now selling off his tools. My cousin had informed me that a furnace was up for sale and I went to investigate. When I heard the name and location, I flashed back 20+ years. His family was  getting ready to load it into the roll off dumpster. Nobody wanted it and they couldn't sell it. When I shared my story and excitement about acquiring it, his widow came to tears. She was so thrilled to know that the furnace was going to be put back into service. And so it has been. So far, I'm casting only aluminum. And in the upcoming posts, I will be sharing items I have cast. Some will be available to purchase. Some will be railroad related and some will not. But all of it has been a blast to make.

Tuesday, December 14, 2010

The making of a real steam locomotive.

Hello,
Take a minute and check out the 1928 black and white silent movie on the manufacturing of a full size steam locomotive.
http://www.cinemamuetquebec.ca/content/movies/23?lang=en

Sunday, October 3, 2010

Cast iron trucks gets new shoes.

I decided to install a brake system on these trucks because there has been times when I really wished I had a little more stopping power. I went through some magazine articles, specifically the articles on the Fitchburg Northern. As some of you may be aware of, that was the first loco I built. I sold it on e-bay and shipped it out to New Mexico. Anyway, I still have most of the articles from that project and I really liked the tender's brake set up. So, for the most part, here it is.
This first pic is of the bronze ring I turned and then segmented out for the shoes. Yes, I did match the tread taper on the bore of the ring. I use J-B Weld to glue the friction material to the bronze shoe. The non-metalic friction material came from McMaster-Carr.
Here are all the brake components. It took some time to figure out the first set, but once all the dimensions were established, the second truck went fast.

Orginally, the friction material was 1" wide. I used a utility knife to score and split the material into two 1/2" widths. The material was 3/16" thick and a little stiff to bend around the contour of the wheel, but two sided tape and masking tape helped hold things in place while the epoxy cured.
The effort to apply the brakes is so minimal that you can't roll the truck by gently pulling it by the brake lever.
There are extra holes at the bottom of the hangers for springs to help keep shoes from dragging on the wheels. I know, I know, I gotta get that paint off the tires contact patch.

Friday, September 17, 2010

Today all the tires got faced to approx. thickness leaving .025 per side, which will come off after being fit to the rims.
Then all the rims got turned to finish size which is .oo5 over the ID of the tire.

Then the bolsters got finished and are ready to slide into the side frames....after a little filing....

Thursday, September 16, 2010

Truck castings

Picked up a set of cast truck frames at a swap meet. I have always hesitated in purchasing a set just due to the fact that the bearing boxes are one with the frames. This puts a serious damper on the flexibility factor. There is enough meat to put in ball bearings, but that means that either the O.D. or the I.D. has to be a press fit, which removes one more factor in the flexibility department. So I set out to figure a way to use oil lite bushings and keep them from spinning in the bearing boxes.
I wanted to avoid using a pin or a bolt and after my usual "I'll just sleep on it routine." I came up with trimming the flange portion of the bushing and milling a pocket in the frame. I just drilled a 3/4" hole, milled the pocket and dropped the bushing in place. There is plenty of flexibility and the bushing won't spin.
I will drill a small oil hole in the fake bearing box cover, pack felt in the bottom of the drilled hole and drop in the bushing. This will keep the bushing well lubricated and allow for easy bushing replacement when the time comes. I am also intent on putting manual brakes on these trucks.

Besides the truck frames I picked up this year, last year I picked up a good number of cast wheels. Now I just think spoked wheels look fantastic, but on my orginal engineer's car, the wheels were steel and in just four years, I have wore a slight groove in the tread. So, I know that a set of cast iron wheels on an engineer's car won't last very long. What to do ? What to do ?

Do what the real manufactures did, put a steel tire on the cast wheel. I pulled out my 1940 machinist hand book which has all kinds of railroad standards and looked up shrink fits for steel tires on cast iron wheels and sure enough it was in there. The cast iron wheel needs to be .005 larger than the bore of the tire. I'm going to use a propane turkey broiler burner to heat the tire up and then drop the cast iron wheel into place.


So, stand by for updates of this adventure.....

Monday, August 9, 2010

Steam Camp @ NOELS track 2010

This was the lucky group attending an informal class. There was alot of hands on projects.
And the best (bias opinion) part of all was the steamers.

There was three of us. John Murray with his 0-4-0 switcher; George Santin with his Heisler: and I with my Clishay.
George was the first one out of the steaming bay, he got swarmed.
And here's Mr. Motion, a.k.a. Richard Sales with his easy to run, Shifter.
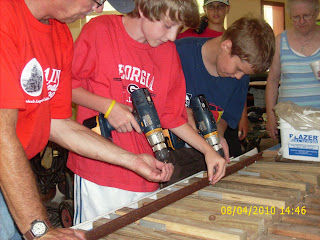
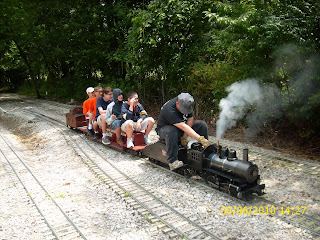
The campers really enjoyed running the Shifter.
And of course, A Grand Time Was Had By All.

Sunday, August 8, 2010

Discover Live Steam Convention @ Mill Creek Central RR.

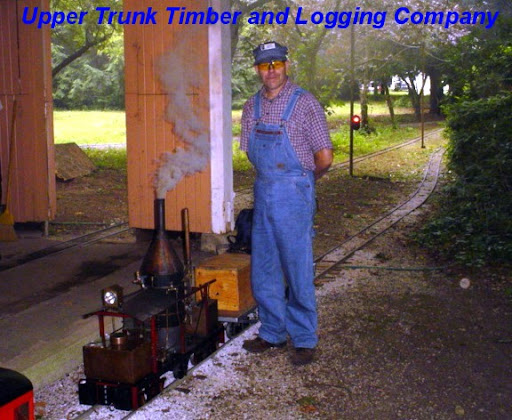
In the above photo: I don't know how many times I have seen this gentleman in magazine pictures or on someones website running this Clishay. I never thought I would see him in person. But there he was at the Discover Live Steam Convention at Mill Creek Central Rail Road.


Here is an O.S. Locomotive. The craftsmanship is very good. Ran on propane and first time out on the track, I did not hear any complaints or issues come up. Personally, I did not care for the roar of the burner, only because you couldn't hear the "bark" of the engine working.


Then there was this derailment which occured right in front of Vendor's Row. I heard it as it was happening and I went over to lend a hand. I could not help but take these two pics before helping out. My caption for the last picture would read something like;

"Derailment...What derailment..?"


Back at the campsite, we were right beside a mainline, so in the evening we would sit and watch the locos go by. I downloaded this app for my phone which does some interesting things with pictures. Here are a few examples.
And as a side note, I don't think wearing clothes that match your engine is always a good thing.

Tuesday, May 18, 2010

A rolling chassis

As I had mentioned in my last podcast, I was having some modem issues. The cable guy came out and got things going this morning so I'm playing "catch up" on my blog stuff.
As of 5-10-10 the Heisler has been up on the trucks with drive shafts, gearboxes and cylinders / crankcase in place and linked up.
Everybody is also up on the new engine stand, but I don't have pictures of that yet, but I will soon.
I am trying to use my spare time to get ready for the club meet next month so I can at least have the Heisler out at the track in good rolling order. I should have it at one of the steaming bays, provided they are not all full.

Could'a been worse...

While working on a revision to the Clishay's "tender / support vehicle" I had to remove the old coupler pockets and incorporate a spine to the car. This spine would also serve as the coupler pockets. I tried using my disc grinder but even with a 6" cut off wheel, I couldn't reach the welds holding the existing coupler pocket to the truck's bolster. So I decided to let the Bridgeport do the work. And as you can see in the pictures, it worked, and then some.
I was lucky.
During the first cut I was conventional milling on the back side of this coupler pocket. I did not have very much to clamp on. Yes, I realize that taking the truck apart would have given me more material to clamp against, but where's the fun in that ? Anyway, I was taking a good bit of material off and the end mill grabbed and sucked the whole truck up into the quill. The end mill exploded and before I could shut the motor off, it stalled. It was in back gear and that's the first time I ever heard that phase converter grunt that hard.
Other than destroying a 3/4" 4 flute end mill and contorting the truck into a very un-natural position, I fared well.
Oh, I almost forgot to mention that it jacked the vise out of indication and the mill head needed swept back in on both axis.
I have to say that this is probably one of the worst crashes, second only to that big horizontal G&L I crashed back in "88". I told them not to put me on that machine...